같은 서버에 다행히 PHP도 설치가 되어있어서, 서버 구성에 손대지 않고 API를 이 참에 다 갈아엎고자 PHP로 작업을 진행하고 있습니다.
보통 mysql(maria db)과 많이 사용하여서 Mssql과 연동하는 작업은 전무했던터라 자주사용하는 소스를 공유드리고자 합니다.
1. DB 접속정보를 갖고 있는 config.php
config.php를 생성하여 상수로 자주 사용할 정보들을 define 해줍니다.
<?php
	// IP는 예시이므로 사용하실 IP로 변경해주세요
    // DB 주소 (메인 DB와 테스트 DB를 사용)
    define('DB_MAIN','192.100.100.111');
    define('DB_TEST','192.100.100.112');

	// 데이터베이스 이름
    define('DB_EMPL','사원관리DB');
    define('DB_SALARY','급여관리DB');

	// DB 접속 정보
    define('DB_ID_ADMIN','id_admin');
    define('DB_PW_ADMIN','pw_admin');

	// 인코딩
    define('DB_CHARACTERSET','UTF-8');

?>
2. config.php를 include 해주고 같은 경로에 select.php 라는 예제 파일을 아래와 같이 작성해보겠습니다.
각 코드별로 주석을 기재하였으나 어려우신 분들은 언제든 댓글 달아주세요 :)
<?php
header('Content-Type: text/html; charset=utf-8');
// 테스트할 때 모든 에러를 출력해주는게 좋습니다.
error_reporting( E_ALL );
ini_set( "display_errors", 1 );
// DB 연결과 관련한 상수에 대한 값을 불러와줍니다.
// 예를들어 select.php, update.php 등의 CRUD 작업페이지가 여러개라 할 때, DB의 접속 정보가 변경된 상황이 발생할 경우
// Config.php만 변경해주면 됩니다.
include 'config.php';
?>
<html>
<head>
<meta charset="utf-8">
</head>
<body>
<?php
// 연결할 MSSQL 서버에 대한 정보를 입력해줍니다.
$serverName = DB_TEST;
$connectionOptions = array(
"database" => DB_EMPL, // 데이터베이스명
"uid" => DB_ID_ADMIN, // 유저 아이디
"pwd" => DB_PW_ADMIN, // 유저 비번
"CharacterSet" => DB_CHARACTERSET // 한글꺠짐 방지!
);
// --------------------------------------------------------------------
// SQL 조건문에 변수를 넣을 경우 활용 하는 방법
// 1) 변수에 그대로 값 대입
$F_EMPL_CODE = '사번';
$F_START_DATE = '날짜';
// 2) URL에 입력된 변수를 불러올 경우
// 테스트는 GET / API 호출은 POST 사용
// ex) http://localhost/select.php?EMPL_CODE=사번&START_DATE=데이타
$F_EMPL_CODE = $_GET['F_EMPL_CODE'];
$F_START_DATE = $_GET['F_START_DATE'];
// --------------------------------------------------------------------
// 결과값을 받을 변수
$F_START_TIME = '';
// DB 연결
$dbconn = sqlsrv_connect($serverName, $connectionOptions);
// 연결 확인
if ($dbconn) {
echo "DB 연결 완료<br><hr>";
}else{
echo "DB 연결 실패<Br>";
die( print_r( sqlsrv_errors(), true));
echo "<hr>";
}
// 쿼리 작성
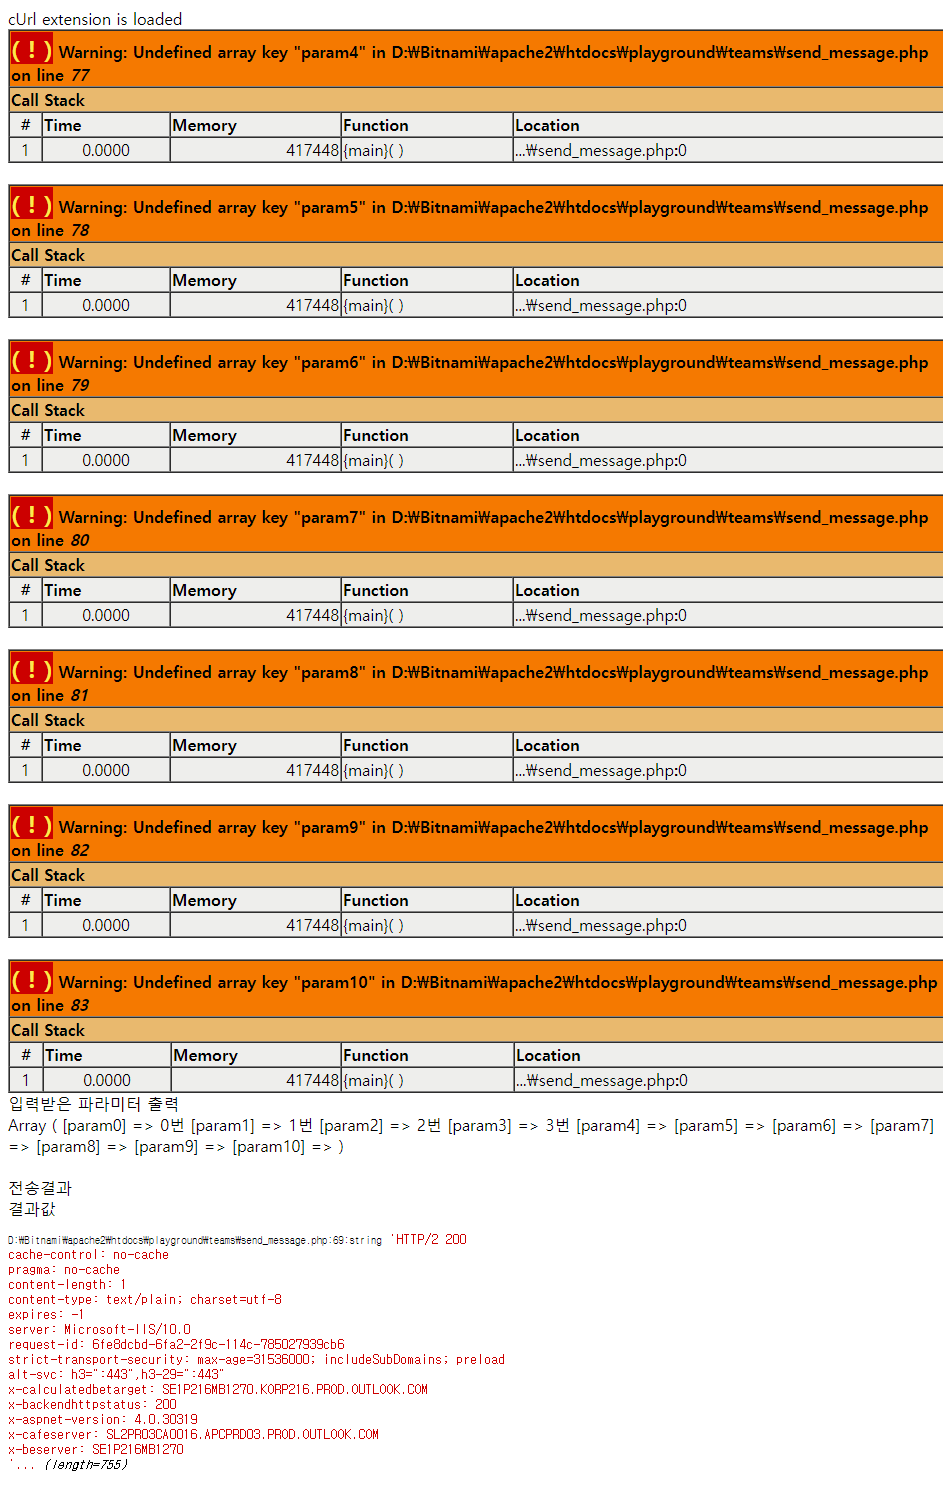
$query = "SELECT * FROM 출근기록테이블
WHERE 사번 = '$F_EMPL_CODE' and 날짜 = '$F_START_DATE'";
// 쿼리를 실행하여 statement 를 얻어온다
$params = array();
$options = array( "Scrollable" => SQLSRV_CURSOR_KEYSET );
$stmt = sqlsrv_query($dbconn, $query, $params, $options );
// 쿼리 결과 'row' 수를 반환해준다
$row_count = sqlsrv_num_rows($stmt);
// 결과가 1개 이상 있다면?
if($row_count >= 1){
// statement 를 돌면서 필드값을 가져온다
while ($row = sqlsrv_fetch_array($stmt, SQLSRV_FETCH_ASSOC))
{
// 출력할 $row['컬럼명']; 형태로 출력해줌
$F_START_TIME = (string) $row['근무시간'];
echo $F_START_TIME."<Br>";
}
}else{
echo "조회된 정보가 없습니다";
}
// 데이터 출력후 statement 를 해제한다
sqlsrv_free_stmt($stmt);
// 데이터베이스 접속을 해제한다
sqlsrv_close($dbconn);
?>
</body>
</html>
Bitnami WAMP 로컬 서버 경로 - 드라이브\Bitnami\apache2\htdocs
이 전에 Ci3로 생성한 task라는 웹 서버 경로(Bitnami\apache2\htdocs)에 static 폴더를 생성 한 후,
템플릿 적용에 필요한 폴더(css, js 등)을 복사하는 작업까지 마쳤습니다.
이번엔 템플릿을 적용하기 위해 <link>, <script> 태그 내에 경로를 설정하여 Ci3에서 경로지정을 어떻게 효과적으로 하는 지에 대해 중점적으로 알아보겠습니다
1. 컨트롤러 생성
Ci 3는 MVC 패턴이 기반이므로 컨트롤러부터 생성을 해줘야합니다.
'Task/Application/Controller' 경로 안에 'Home.php'라는 파일을 생성한 후 'Home' 컨트롤러 클래스를 작성해줍니다.
<?php
defined('BASEPATH') or exit('No direct script access allowed');

class Home extends CI_Controller
{

  public function __construct()
  {
    parent::__construct();
  }

  public function index()
  {
    //
  }

}
'Task' 컨트롤러를 아래 경로로 호출해보겠습니다.
http://localhost(:포트를 별도로 설정한 경우 포트)/task/index.php/home
빈 화면이 정상적으로 출력됩니다
2. View 호출
Ci3는 컨트롤러를 호출하면 컨트롤러 내에서 화면 구성 코드가 작성된 'View'를 호출하는 구조를 갖습니다.
기본으로 생성된 'welcome_message.php'를 호출해보겠습니다.
아래 'Controllers/Welcome.php' 코드를 먼저 살펴보면 index() 함수안에 view를 불러오는 코드가 작성되있습니다.
defined('BASEPATH') OR exit('No direct script access allowed');

class Welcome extends CI_Controller {

	/**
	 * Index Page for this controller.
	 *
	 * Maps to the following URL
	 * 		http://example.com/index.php/welcome
	 *	- or -
	 * 		http://example.com/index.php/welcome/index
	 *	- or -
	 * Since this controller is set as the default controller in
	 * config/routes.php, it's displayed at http://example.com/
	 *
	 * So any other public methods not prefixed with an underscore will
	 * map to /index.php/welcome/<method_name>
	 * @see https://codeigniter.com/user_guide/general/urls.html
	 */
	public function index()
	{
    	// welcome_message view 호출
		$this->load->view('welcome_message');
	}
}
'Task/application/views'경로 안에 'welcome_message.php' 파일이 있습니다.
<?php
defined('BASEPATH') OR exit('No direct script access allowed');
?><!DOCTYPE html>
<html lang="en">
<head>
	<meta charset="utf-8">
	<title>Welcome to CodeIgniter</title>

	<style type="text/css">

	::selection { background-color: #E13300; color: white; }
	::-moz-selection { background-color: #E13300; color: white; }

	body {
		background-color: #fff;
		margin: 40px;
		font: 13px/20px normal Helvetica, Arial, sans-serif;
		color: #4F5155;
	}

	a {
		color: #003399;
		background-color: transparent;
		font-weight: normal;
	}

	h1 {
		color: #444;
		background-color: transparent;
		border-bottom: 1px solid #D0D0D0;
		font-size: 19px;
		font-weight: normal;
		margin: 0 0 14px 0;
		padding: 14px 15px 10px 15px;
	}

	code {
		font-family: Consolas, Monaco, Courier New, Courier, monospace;
		font-size: 12px;
		background-color: #f9f9f9;
		border: 1px solid #D0D0D0;
		color: #002166;
		display: block;
		margin: 14px 0 14px 0;
		padding: 12px 10px 12px 10px;
	}

	#body {
		margin: 0 15px 0 15px;
	}

	p.footer {
		text-align: right;
		font-size: 11px;
		border-top: 1px solid #D0D0D0;
		line-height: 32px;
		padding: 0 10px 0 10px;
		margin: 20px 0 0 0;
	}

	#container {
		margin: 10px;
		border: 1px solid #D0D0D0;
		box-shadow: 0 0 8px #D0D0D0;
	}
	</style>
</head>
<body>

<div id="container">
	<h1>Welcome to CodeIgniter!</h1>

	<div id="body">
		<p>The page you are looking at is being generated dynamically by CodeIgniter.</p>

		<p>If you would like to edit this page you'll find it located at:</p>
		<code>application/views/welcome_message.php</code>

		<p>The corresponding controller for this page is found at:</p>
		<code>application/controllers/Welcome.php</code>

		<p>If you are exploring CodeIgniter for the very first time, you should start by reading the <a href="user_guide/">User Guide</a>.</p>
	</div>

	<p class="footer">Page rendered in <strong>{elapsed_time}</strong> seconds. <?php echo  (ENVIRONMENT === 'development') ?  'CodeIgniter Version <strong>' . CI_VERSION . '</strong>' : '' ?></p>
</div>

</body>
</html>
코드를 보시면 대부분 HTML로 구성되있음을 알 수 있는데 처음 MVC를 접하였을 때 이 부분에서 많이 헷갈려하십니다.
View 코드만 불러오면 되는 걸 왜 Controller를 통해서 불러와야 하냐는 의문을 갖는 것이 당연합니다.
간단하게 설명드리면 화면구성(UI)과 데이터처리(데이터 모델링)을 분리하여야 유지보수도 쉽고 컨트롤러만 사용자의 요청을 처리하면되는 구조가 보안성을 더 높여주기 때문입니다. 데이터처리, 화면 등의 모든 코드가 한 페이지에만 작성 될 경우 웹 브라우저 내에 데이터가 노출될 위험이 굉장히 높아집니다
* MVC 패턴에 대한 내용은 자세히 다음에 다루도록하겠습니다.
다시 돌아와서 'Home' 컨트롤러 클래스 index()함수에 'Welcome' 컨트롤러 클래스의 index()함수 내에 작성된 아래의 코드를 복사하여 붙여줍니다.
$this->load->view('welcome_message');
그럼 'Controllers/Home.php' 클래스는 아래와 같이 완성됩니다.
class Home extends CI_Controller
{

  public function __construct()
  {
    parent::__construct();
  }

  public function index()
  {
    // 테스트를 위해 Welcome_message 뷰를 호출 해보자
    $this->load->view('welcome_message');
  }

}
작성 후 다시 아래 주소를 호출해볼까요
http://localhost(:포트를 별도로 설정한 경우 포트)/task/index.php/home
&nbsp;welcome_message 뷰가 잘 불러와졌습니다
'Welcome' 컨트롤러 클래스처럼 welcome_message 뷰가 잘 호출되었습니다.
위 경로 안에 'welcome.php'라는 파일을 확인 할 수 있는데, 간단히 살펴보면 "Welcome"이라는 php 클래스 파일입니다.
<?php
defined('BASEPATH') OR exit('No direct script access allowed');

class Welcome extends CI_Controller {

	/**
	 * Index Page for this controller.
	 *
	 * Maps to the following URL
	 * 		http://example.com/index.php/welcome
	 *	- or -
	 * 		http://example.com/index.php/welcome/index
	 *	- or -
	 * Since this controller is set as the default controller in
	 * config/routes.php, it's displayed at http://example.com/
	 *
	 * So any other public methods not prefixed with an underscore will
	 * map to /index.php/welcome/<method_name>
	 * @see https://codeigniter.com/user_guide/general/urls.html
	 */
	public function index()
	{
		$this->load->view('welcome_message');
	}
}