이미지 전처리를 위해서 이미지 파일 내에 불필요한 부분을 제거하기 위해서 특정 객체가 포함된 부분(ROI와 비슷)만 남기는 작업을 해야했습니다.
cv2로 bitmap 처리를 해보니 시간도 많이 소요되고 효율성이 좋지 않아 ai model을 사용하기로 하였고 결과는 성공적이었습니다.
정지 영상(image)에 어떤 객체들이 있는지 python으로 yolo 모델을 활용하여 이미지 내의 객체들을 찾는(detection) 코드를 구현하였습니다.
추가로 이미지 내에서 인식(Detection)된 객체의 좌표를 불러와서 특정 객체만 남기고 이미지를 crop하는 기능까지 구현한 내용입니다.
설치
1. pythorch
pip install torch torchvision torchaudio
2. yolo v5 repository
pip install yolov5

git clone https://github.com/ultralytics/yolov5.git
cd yolov5
pip install -U -r requirements.txt
* clone할 공간은 작업중인 폴더 안에서 실행해도 무관합니다
Image Detection 사용하기 (1) 터미널 명령어 (단 한 줄)
terminal 명령어로 이미지 경로를 지정해주기만해도 간단하게 사용할 수 있습니다.
yolov5 폴더로 이동한 후 아래 명령어를 입력하면 웹캠 영상, 정지된 영상을 바로 실습할 수 있습니다.
python detect.py --source /path/image/free-video-854671.jpg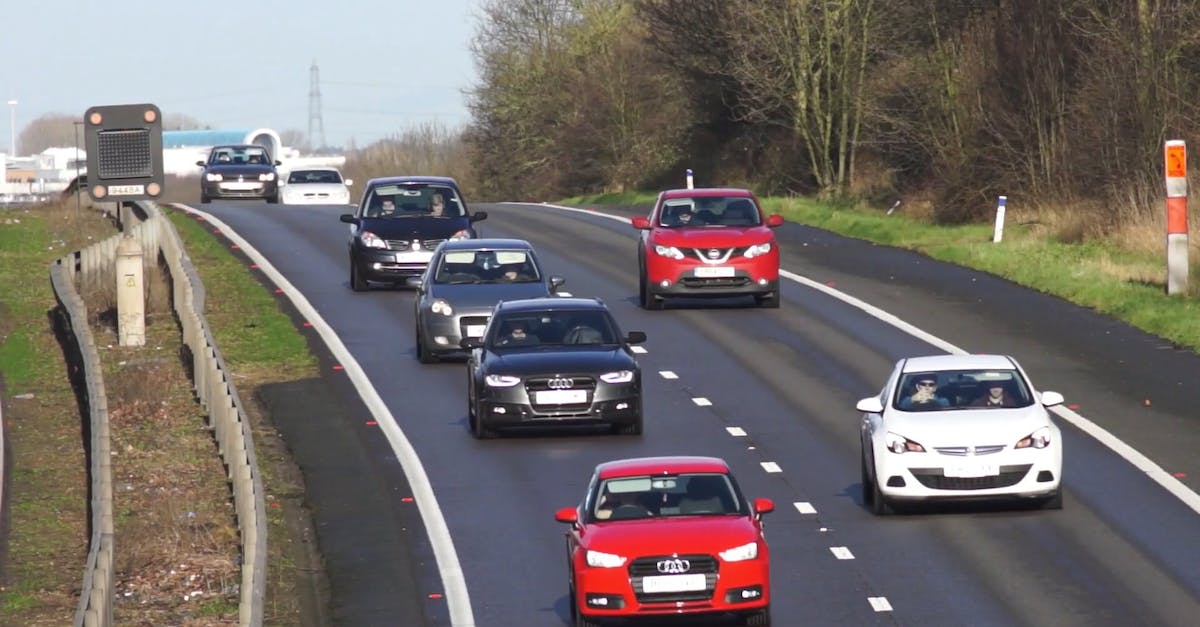
명령어 실행 결과 ...
user@mypc % python detect.py --source /path/image/free-video-854671.jpg
detect: weights=yolov5s.pt, source=/path/project/free-video-854671.jpg, data=data/coco128.yaml, imgsz=[640, 640], conf_thres=0.25, iou_thres=0.45, max_det=1000, device=, view_img=False, save_txt=False, save_csv=False, save_conf=False, save_crop=False, nosave=False, classes=None, agnostic_nms=False, augment=False, visualize=False, update=False, project=runs/detect, name=exp, exist_ok=False, line_thickness=3, hide_labels=False, hide_conf=False, half=False, dnn=False, vid_stride=1
YOLOv5 🚀 v7.0-267-gc42aba5 Python-3.8.18 torch-2.1.2 CPU

Fusing layers...
YOLOv5s summary: 213 layers, 7225885 parameters, 0 gradients, 16.4 GFLOPs
image 1/1 /path/project/free-video-854671.jpg: 352x640 9 persons, 7 cars, 1 bus, 2 trucks, 80.7ms
Speed: 0.7ms pre-process, 80.7ms inference, 7.3ms NMS per image at shape (1, 3, 640, 640)
Results saved to runs/detect/exp5
맨 아래줄에 detection이 끝난 결과에 대한 경로가 있습니다.
Results saved to runs/detect/exp5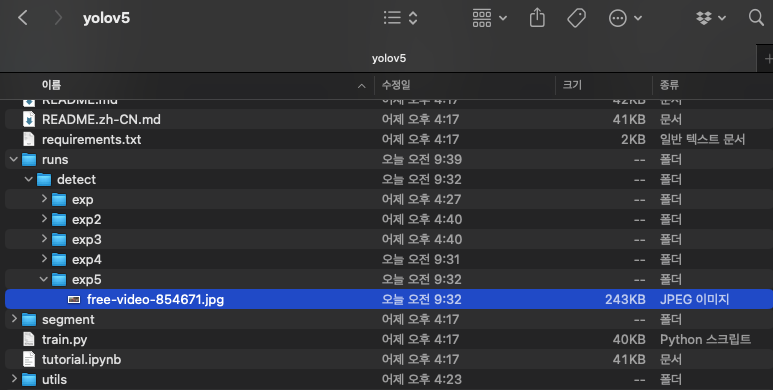

분석이 끝난 이미지를 간단하게 확인할 수 있습니다.
truck, bus같은 경우 인식 오류가 발생한듯 싶으나 대체로 잘 인식한 걸 확인할 수 있습니다.
Image Detection 사용하기 (2) 터미널 명령어를 파이썬 코드로 실행
import subprocess

# 이미지 파일의 경로
image_path = 'path/to/your/image.jpg'

# detect.py 스크립트를 파이썬으로 호출
result = subprocess.run(['python', 'yolov5/detect.py', '--source', image_path])
terminal 에서 실행한 명령어를 파이썬의 subprocess 패키지를 이용해 코드로 실행한 코드입니다.
Image Detection 사용하기 (3) 파이썬 코드로 실행
모델을 불러오고, 분석할 이미지 파일을 모델에 넣어준 뒤에 결과를 받는 코드입니다.
파이썬 코드로 실행하게 되면 결과에 대한 다양한 값들을 확인하고 응용할 수 있습니다.
import torch
from pathlib import Path
from yolov5 import detect
import os
from PIL import Image, ImageDraw

def vehicle_detection_yolov5(image_path):
    model = torch.hub.load('ultralytics/yolov5:master', 'yolov5s')
    # Inference
    results = model(image_path)
    # Results, change the flowing to: results.show()
    results.show()
    # results.save()
    print(results.s)

    return results


data_path = 'car_image'
image_files = [f for f in os.listdir(data_path) if f.lower().endswith(('.png', '.jpg', '.jpeg', '.gif'))]

for image_file in image_files:
    print(image_file)
    results = vehicle_detection_yolov5(f'{data_path}/{image_file}')
    print(results.s)
'car_image'라는 폴더 안에 있는 이미지파일들을 일괄적으로 분석할 수 있게 코드를 구현하였습니다.